How to Create POI Tour Guides - A Series of Posts

Post Reply
jfheath
Posts: 2385
Joined: Sat Oct 19, 2019 4:17 pm
Location: West Yorkshire, Uk
Has liked: 302 times
Been liked: 649 times
Great Britain

How to Create POI Tour Guides - A Series of Posts

Post by jfheath »

#1 Tour Guides - OverView

A TourGuide is a feature which allows Saved locations to be plotted on a map which will alert your when you get close enough.
  • A POI is plotted on the map
  • An MP3 file can be played when you are in the vincity - this could be music, a narrative or a simple ping.
  • A photo to accompany the alert sound is displayed on the screen.
  • TourGuide Points operate independently of routes. As soon as you enter the perimeter of a POI, the alert information pops up.
  • Each point can be created with a different perimiter, show a different icon and play a different mp3 file.
10TourGuide Alert.png
10TourGuide Alert.png (564.53 KiB) Viewed 108 times

In the above screen shot, a POI is identified by a large white disk - about 300m from the road that I am traveling. In this case the proximter value is set at 0.4 miles. As soon as I get within 0.4m from any direction, the sound plays on the Zumos MP3 player, and the picture pops up on the screen.

This is not because I am traveling along a route, or because I am approaching the blue disc shaping point, or the finish point. It is because I have just passed throught the 0.4 mile circular perimeter that I set for the white disc.

In this case I am using the XT at my desk - in order to move the bike, I need the bike to be moving, so I am simulating this using a route.

It is a facility that is made available for companies that offer guided tours of eg stately gardens. You are free to wander around at will, but when you get to a particular point - you get the photo and a narrative. Or when you are within 100m of a particular point, you get an indication that there is something of interest and some instructions on how to get there.

Whatever narrative you choose, you have to remember that this thing is triggered regardless of the direction of travel. So giving instructions like 'Turn left' are not helpful. 'Head north' is better, but it relies on the user knowing where north is.

In order to keep this brief, I am not going to repeat the 'How To' information from the POI series of pages.
Have owned Zumo 550, 660 == Now have Zumo XT2, XT, 595, 590, Headache
Use Basecamp (mainly), MyRouteApp (sometimes)

Links: Zumo 590/5 & BC . . . Zumo XT & BC
jfheath
Posts: 2385
Joined: Sat Oct 19, 2019 4:17 pm
Location: West Yorkshire, Uk
Has liked: 302 times
Been liked: 649 times
Great Britain

How to Create POI Tour Guides - Series of Posts

Post by jfheath »

#2 Tour Guides - Create Your Folder Structure

This is best if the main folder is just off the Route.

I will use J:/TG-Demo/

Inside that I need 3 sub-folders - one for the files that are associated with each Waypoint/POI. If you have more Waypoints, you need more subfolders:

J:\TG-Demo\TourGuide-01\
J:\TG-Demo\TourGuide-02\
J:\TG-Demo\TourGuide-03\

Two of the filenames themselves must contain the word TourGuide. Capital T Capital G.
It is very helpful if there are no spaces in the folder names - because of what needs to be done later.
It is helpful to have the folders and filenames numbered - because the folders and files need to be kept together

So later on I will have TourGuide-01.mp3, TourGuide-01.jpg for the sounds and image respectively. They will be placed in subfolder TourGuide-01

The icon doesn't have to be called TourGuide - it can be named more appropriately - eg Red.bmp, Green.bmp.

Whatever it is called, the apporopriate icon has to be placed in the same folder - eg TourGuide-01

So if you want to use the red icon for 10 different points, then the same red icon has to be placed in 10 subfolders.
Have owned Zumo 550, 660 == Now have Zumo XT2, XT, 595, 590, Headache
Use Basecamp (mainly), MyRouteApp (sometimes)

Links: Zumo 590/5 & BC . . . Zumo XT & BC
jfheath
Posts: 2385
Joined: Sat Oct 19, 2019 4:17 pm
Location: West Yorkshire, Uk
Has liked: 302 times
Been liked: 649 times
Great Britain

How to Create POI Tour Guides - Series of Posts

Post by jfheath »

#3 Tour Guides - Create Sound, Icon, Image

The picture can be a photograph or a drawing - anything that can be saved as a JPG file.

Whatever size it is, it will be reduced in size to fit into a 480x360 windows on the Zumo screen. This may mean that the image is stretched or squashed, or it may mean that there is a blank space top/bottom or on the two sides.

It is better to sort out the size for yourself in an image editor. I still use a very early version of Paintshop Pro, even though I have much later versions.

For this demo, I just found 3 images of motorbike. The website has reduced these images - click on them to see the full size version. Each of the three images is 480 x 360

12 Three Images.png
12 Three Images.png (427.57 KiB) Viewed 103 times

Each image must be named with TourGuide in its name. We chose the format
TourGuide-01.jgp; TourGuide-02.jpg; TourGuide-03.jpg
(Actually the rule is - it has to have no spaces, it has to contain the word TourGuide and it has to be the same name as the mp3 file.)

Each file must be placed in the folder that has the same name
so TourGuide-01.jpg is placed in the TourGuide-01 folder.


Icons and Sound

This is identical to the way in which the icon and sound files are made in the POI thread. I'll reproduce the relevant bits here.

Create a Homemade Icon

The Garmin documentation, such as it is, requires the image to be
  • 24 x 24 pixels - this is about the size of the blue disc shaping point. I have tried larger sizes - 36x36 and 48x48 and both seemed to work on the XT. 48x48 was a bit large though.
  • 8 bit or 16 bit colour code (8 bit gives 256 different colours, 16 bit gives 65,536 different colours). 8 bit is plenty !
  • Saved as a Windows / OS2 bitmap file with the BMP extension.
The picture below shows the 24 x 24 image. On the left, I have enlarged it to make the idividual pixels very clear. The smaller version is what it looks like in the editor actual size. On the right is how the same icon appears on the XT screen.

Note that in the demo, I have used 36x36 bitmap images for the icons. They seem to work OK with the Zumo XT - but the documentation was written a long time before the XT came out. If you are trying this on anything earlier than XT, there may be issues.

Image Compare.png
Image Compare.png (30.19 KiB) Viewed 103 times

The magenta colour (RGB = 255,0,255) will be regarded by the XT as transparent. All you will see is the black and the yellow - the magenta will not be seen and anything that is behind it will be seen.

Save the bmp file with a name that you will recognise by the icon concerned as it may be used with a number of different waypoints. Save it in the folder for the Waypoint/POI - eg J:\TG-Demo\Yellow.bmp


Create a 'Ping' ... alert sound

This can be any mp3 file. It needs to be resonably loud and could be a simple ping sound or a voice recording, or a complete piece of music. Up to you. Audacity is a free piece of software that allows you to edit and create MP3 files. Google it. It's free. It is brilliant.

Audacity.png
Audacity.png (21 KiB) Viewed 103 times

Find or make a sound and store it in the folder for the Waypoint/POI. I created one with me saying 'Point One'.
Save this as (eg) J:\TG-Demo\TourGuide-01\TourGuide-01.mp3
Have owned Zumo 550, 660 == Now have Zumo XT2, XT, 595, 590, Headache
Use Basecamp (mainly), MyRouteApp (sometimes)

Links: Zumo 590/5 & BC . . . Zumo XT & BC
jfheath
Posts: 2385
Joined: Sat Oct 19, 2019 4:17 pm
Location: West Yorkshire, Uk
Has liked: 302 times
Been liked: 649 times
Great Britain

How to Create POI Tour Guides - Series of Posts

Post by jfheath »

#4 Tour Guides - Create the GPX file


All images on this page are extracts from full size screen shots. Click on the image in order to see the detail of the original.

We need to use Basecamp for this, and there is a departure from the POI instructions here.

It is possible to put all of the resources - bmp, jpg, mp3 files - into the Basecamp file, but this means 3 individual entries for each waypoint. Which is tedious - but it is logical. If I was only making three POIs I would probably do it that way.

But instead we are going to store an icon with the route point and then point the POILoader to the other files that are in the same folder.
This method needs a little manipulation of a text file - but nothing serious.


In Basecamp

This is similar to the technique used for creating the POIs - but it is not the same - so read on carefully.

There are 2 options to creating the Waypoints
  1. Create each Waypoint individually, and attach each of the three items - icon, picture and sound - to each individual wyapoint - using the Add File Link button in the Notes Tab of the Waypoint Properties Dialogue Box.

    This method gives each point its own individual link to each of the three files - sound, icon, picture. It requires no subsequent editing of the gpx file, but it takes much longer for a lot of Waypoints / POIs
  2. Create a dummy text file which is then copied to each subfolder. You then link to this, rather than to the icon, picture and sound file. This may be much faster than the previous method, but it does require a little bit of extra work before creating the waypoints and after creating the gpx file.

If Using Option 2.
  1. (Option 2)Create a text file in Notepad - Name it Dummy.txt
    Save it in the main folder eg J:\TG-Demo\Dummy.txt
  2. Make a copy of Dummy.txt in every folder that contains the Waypoint details - eg J:TG-Demo\TourGuide-01
    You can do this reasonably quickly with windows file explore. See the bottom of the page.
For Both Options
  1. Create all of the waypoints in Basecamp using the waypoint flag tool
  2. Name each Waypoint whatever you want - but it will help if you include the number that you used in the folder name. Eg 23 Camp Site or Camp Site 23 - That will help you in error-checking. You can remove the numbers later if you wish.
  3. You need to set a Proximity / Perimeter alert for each POI. This can be anything up to 24901 miles. You can multiselect Waypoints, right click to select Open, and enter a value. This will set the same proximity for all of the selected Waypoints.
BC Create Waypoint.png
BC Create Waypoint.png (103.2 KiB) Viewed 99 times

If Using Option 1.

  1. For each Waypoint / POI - In BaseCamp
  2. Click the Notes tab at the top of the dialog box
  3. Click "Add File Link"
  4. Navigate to the folder where the icon, sound and image files are stored. Make sure that it it the folder for this Waypoint. This is where it is handy to have the same number for each BC Waypoint, each sub-folder, and each image and sound file within that folder.
    So in the example image below, I am looking at Waypoint B 01. I navigate to folder J:\TG-Demo\TourGuide-01\and I add each link in turns TourGuide-01.jpg, TourGuide-01.mp3, Red.bmp
  5. Optionally you can add notes - these are dispalyed in the information button when looking at POIs on the XT screen. Unfortunately it displays the text twice - once as a comment, once as a description. I don't know why, and I don't have an answer.
  6. Do the same for every other Waypoint.
  7. My screen image shows Dummy.txt. If using Option 1, you do not need Dummy.txt.
13 Notes Link Option 1 .jpg
13 Notes Link Option 1 .jpg (69.79 KiB) Viewed 99 times


If Using Option 2.
  • If you are using Option 2, then after setting the proximity, click on the Notes tab. Click add a link and navigate to the folder that contains the icon, the image and the sound for this point. Don't bother with the icon, image and sound - just add a link for Dummy.txt.
13 Notes Link Dummy.jpg
13 Notes Link Dummy.jpg (56.16 KiB) Viewed 99 times


Please note that the proximity setting for a Basecamp Waypoint is determined by the value for the Measurement System that is set in Edit -> Options -> Display. Mine is set to Statute (miles and feet). Decimal miles are accepted in the proximity field.


Both Methods

Once the Waypoints are all complete, Select them all from the BC lower left Window,
File -> Export -> Export Selection and Enter
Select the base folder (eg J:\TG-Demo) and enter a file name that you will recognise - eg TourGuideDemo.

Make sure that it is saved as a GPX file.

-----------------------------------------------------------------------------------------------------------------
To copy Dummy.txt a number of times:

Copy it once, past it many times.
Dummy is in the same folder as the subfolders TourGuide-01, TourGuide-02, TourGuide-03 etc

Right click on Dummy.txt. Select Copy from the drop down menu.
Right click on the TourGuide-01 folder name, select Paste
Right click on the TourGuide-02 folder name, select Paste
Right click on the TourGuide-03 folder name, select Paste
Have owned Zumo 550, 660 == Now have Zumo XT2, XT, 595, 590, Headache
Use Basecamp (mainly), MyRouteApp (sometimes)

Links: Zumo 590/5 & BC . . . Zumo XT & BC
jfheath
Posts: 2385
Joined: Sat Oct 19, 2019 4:17 pm
Location: West Yorkshire, Uk
Has liked: 302 times
Been liked: 649 times
Great Britain

How to Create POI Tour Guides - Series of Posts

Post by jfheath »

#5 Tour Guides - Create the POI file

Prepared Files

We should now have a folder, close to the root, called TG-Demo. (eg J:\TG-Demo)

In there we should have a single GPX file which contain all of the Waypoints that we have prepared. In my image below, the right hand folder tree shows this file as TourGudieDemo.gpx

Also in the folder there should be a number of sub-folders - one that is associated with each POI / Waypoint - These are called TourGuide-01, TourGuide-02, TourGuide-03

In each Sub folder 3 files - for an icon, a sound and a picture. The sound and picture must have the same name, and must contain the word 'TourGuide'.

14 FIles for POI Loader.png
14 FIles for POI Loader.png (58 KiB) Viewed 96 times

If you linked to Dummy.txt, then Edit the GPX file.

This process is not necessary if you linked to each icon, image and sound waves for every Waypoint / POI
If you just added a link for Dummy.txt, we need to change them. That is much easier than it sounds - it is one operation:

Open the GPX file in a simple text editor - like Notepad.
About 35 lines down (it will vary between users), there is a line that says something like
  • <link href="J:/TG-Demo/TourGuide-02/Dummy.txt" />
There will be one line for every Waypoint that you created. We need to change those lines to read :
  • <link href="J:/TG-Demo/TourGuide-02/" />
ie - we need to delete the text 'Dummy.txt'.

Move the cursor back to the top line of the file and then select Edit -> Replace
- you should get a dialog box like the one shown below.

Replace Dummy.png
Replace Dummy.png (7.53 KiB) Viewed 96 times

Type Dummy.txt for the text to replace, and make sure the other text box is empty.
Click Replace all. You can check if you wish that these lines have all been altered.
Then click 'Save'


Run POILoader

When you run POILoader, it will want to know :
  • The folder where you wish to save the POI file. (eg J:\TG-Demo\)
  • The name of the gpx file containing the Waypoints (eg TourGuideDemo.gpx)
  • The location of the data files - gpx file. (eg J:\TG-Demo\)
It will find all of the GPX files that are in that folder, and for each, it will ask if you want the gpx file to be processed.
In this example, there is only one GPX file - TourGuideDemo.gpx - so the question seems a little odd. But if it spots other gpx files, it will ask if you want to process them as well - one after the other. You need to read carefully what POILOader is asking, and make sure that you accept the one(s) that you wish to process.

POI Loader will use the GPX file to identify the route points. Each route point has a proximity / perimeter value.
It knows where the icon, image and sound files are - due to the links that you placed in the notes tab.

If you only placed the Dummy.txt file, we edited the gpx file to point to its location. It searches the entire folder for any relevant files.

POILoader14a.png
POILoader14a.png (39.92 KiB) Viewed 96 times
POILoader 14b.png
POILoader 14b.png (62.3 KiB) Viewed 96 times
Have owned Zumo 550, 660 == Now have Zumo XT2, XT, 595, 590, Headache
Use Basecamp (mainly), MyRouteApp (sometimes)

Links: Zumo 590/5 & BC . . . Zumo XT & BC
jfheath
Posts: 2385
Joined: Sat Oct 19, 2019 4:17 pm
Location: West Yorkshire, Uk
Has liked: 302 times
Been liked: 649 times
Great Britain

Re: How to Create POI Tour Guides - Series of Posts

Post by jfheath »

#5 Tour Guides - Install POI Files and Test


Save the POI file on the XT

The POI file has been saved on the computer in the location that you specified. (eg J:\TG-Demo\TG-Demo.gpi)
Connect the Zumo XT using the USB cable and wait for it to show up in your File Explorer.
Copy the file and paste it onto the SD card Zumo XT/Memory Card/Garmin/POI. If the folder doesn't exist, create it.

You could paste it into Internal Storage/POI - but there are a lot of other files in there as well - It is easier to find and delete, if it is placed on the SD card.

-----------------------
Checking and Testing

Restart the Zumo.
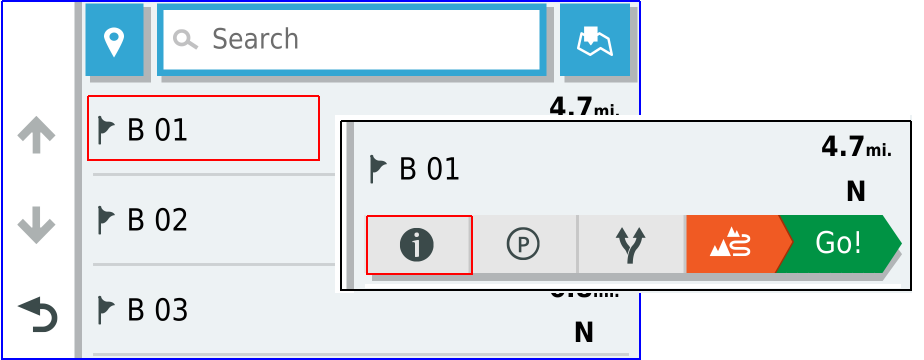
Select Where To -> Categories -> Custom POIs

If there is more than one gpi file in the POI folder, they will be listed by the name of the file
Otherwise if there is only one gpi file, the POIs ill be listed by name.

15 POI List.png
15 POI List.png (40.95 KiB) Viewed 95 times

Select each one in turn to check. For each, tap the information (i) button.

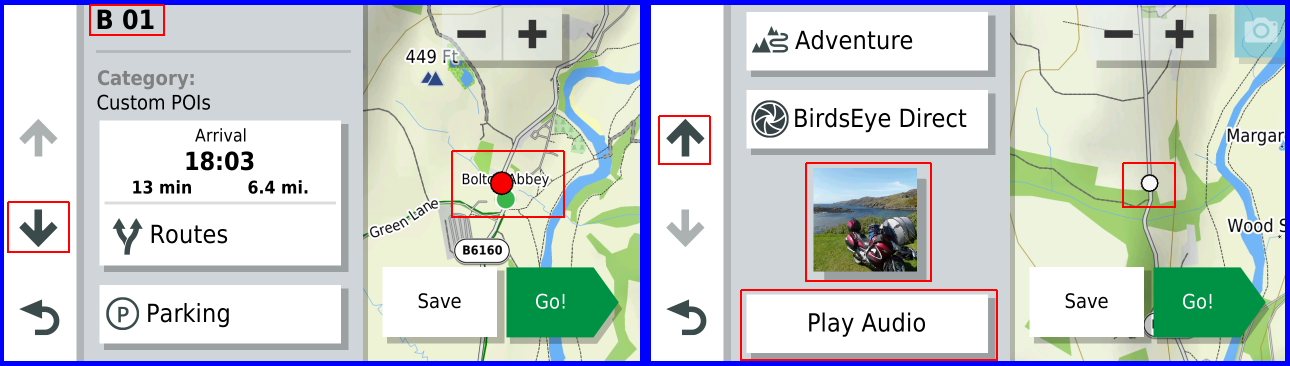
The picture below shows the first two POIs. The image on the left is point B01 with its large red icon. The display on the left of the map is scrollable - here showing the top section.

The image on the right shows the info screen for Point B03 with map on the right, and the information display on the left - this time showing the bottom half of the scrollable display. The bootom half shows the image and a button to 'Play Audio' - to test that the correct sound file is linked to the POI and the image. The map shows the smaller white icon for point B03.

15 Check Pts 1 & 3.png
15 Check Pts 1 & 3.png (257.04 KiB) Viewed 95 times

Having seen all three, we know for certain that
  • The icon plots to location of the POI
  • The icon is the correct size and colour that we set
  • The image is the correct one for the POI
  • The sound file is the correct one for the POI
  • Most importantly, we have prepared the POI correctly !!

OK - so does it work ?

POIs do not have to be a part of a route at all, although they may be added to a route when using the Trip Planner App on the Zumo screen - available from Categories / Custom POIs when adding a point to a route.

But POIs are displayed on the map and alert when you get within its perimeter. In the TG-Demo gpx file, I set this to a small fraction of a mile. But they proximity can be a much wider circle - something around 37 miles. The alert seems to be triggered at (unknown to me) time intervals while it is within the proximity circle. I have yet to find out what happens in this case if the first sound file is still playing when it want to trigger the repeat !

These points will remain on the Zumo until you take them off, and if you venture into the region where you have laid some TourGuide POIs - they will just pop up with sound, picture and icon as you approach. Whether or not you have a route running.

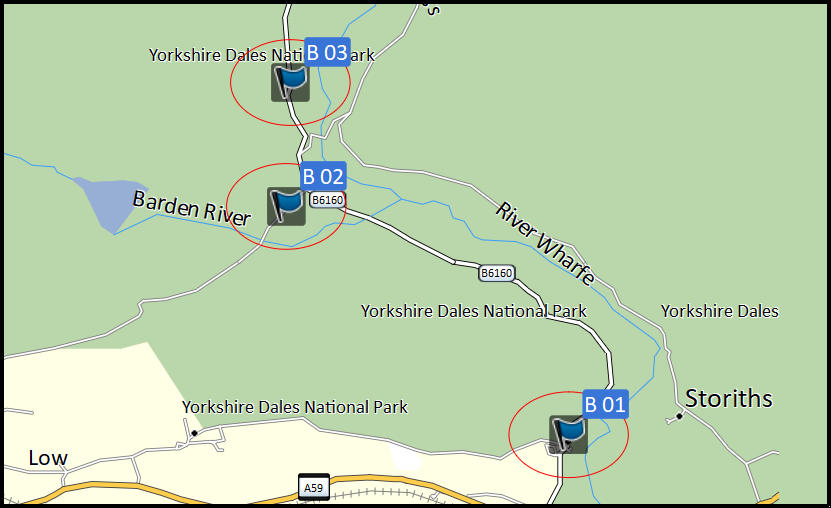
To test that these POIs work, I am going to set a simulated route that travles the road near to which I placed my POIs, and take some screen shots when each alert is triggered by me entering the circle.

POI Map in BC.png
POI Map in BC.png (109.14 KiB) Viewed 95 times

So I will simulate travelling north from the A59 along the B6160. Point 2 is located to the left of the road, but my route will still pass through its perimeter circle - so it should alerts.

Here are three images of the simulated trip, having entered the proximity circle each time.
There is not information displayed on the banner, but the picture popw up with the name of the POI.
In the notes section, it is possible to write some tect - which also pops up - but it does so twice - because the gpx file contains the text as 'information' and 'description'. Oops. This was tested on an XT.

You will have to take my word for the fact that the sound file was played as the image popped up, and with perimeter set at 0.3 miles, the sound file was played just once.


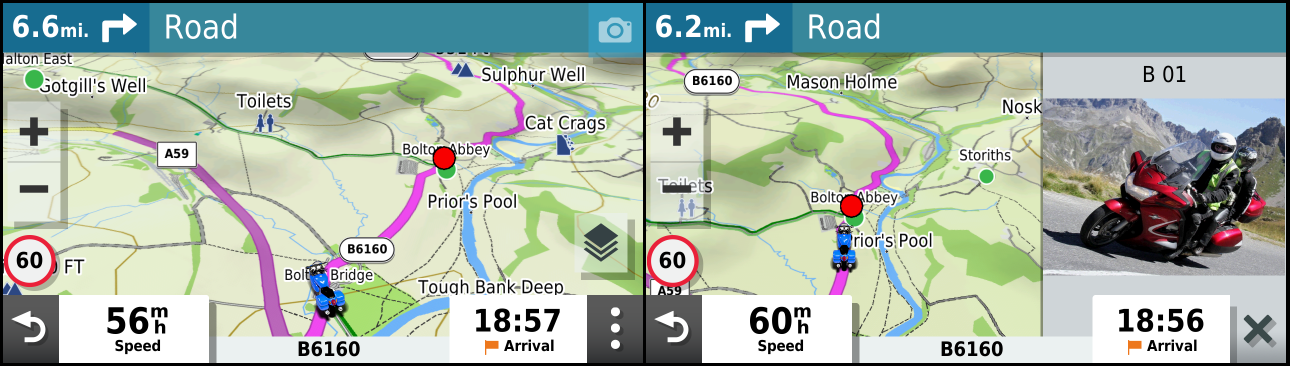
The first picture shows me about to start my simulated ride north on the B6160. Already in the left screen shot, B01 is in view - the large red circle - although I have not yet got close enough to trigger the alert. Ignore the arrival times - they are for the final point on my simulated route. Interesting that in simulation the bike is traveling faster than it calculates. ETA is going down...

The right hand image shows the image for B01 pop up as I get close to the red icon - and the sound file plays. Me saying simply 'Point One'.

15 Test Ride 01.png
15 Test Ride 01.png (518.46 KiB) Viewed 95 times

The next two images show me arriving at points 2 and 3 . Point 2 is located off to the side of the road that I am riding, and shows up as the green circle icon - but it is still within the 0.3 mile perimeter that I set - so the alert is triggered, the sound file plays ("Point Two"), and another picture of my bike is displayed. Note that on this map, Point three (the white icon) is also visible. You don't have to be in range for them to show on the map, they will draw as soon as they are able to show on the map - but as with all detail on a map showing in 3D, it doesn't attempt to draw very small versions of things that are a long way away. At this point B03 is less than a mile away from B02.

The Announcement for Point B03 pops up - again at 0.3 miles distance - and a different image pops up to illustrate.

15 Test Ride 02.png
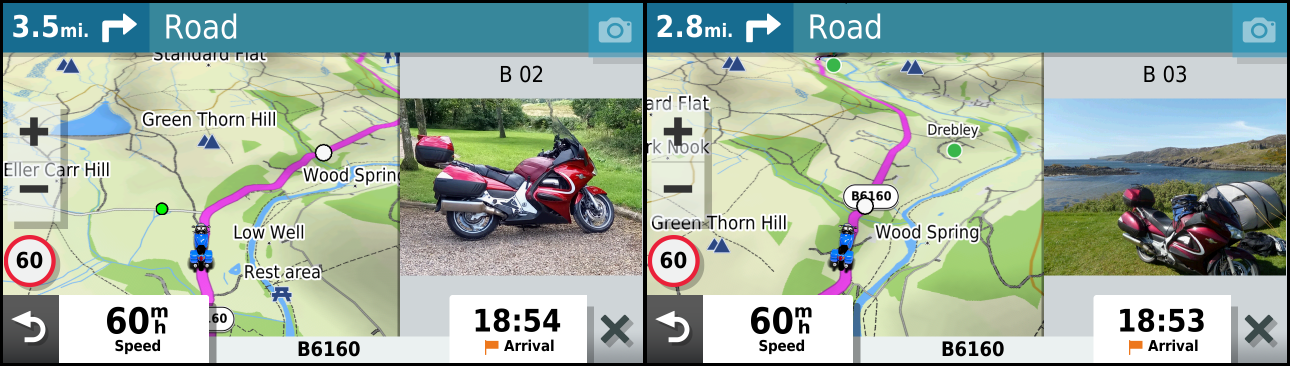
15 Test Ride 02.png (550.99 KiB) Viewed 95 times
Have owned Zumo 550, 660 == Now have Zumo XT2, XT, 595, 590, Headache
Use Basecamp (mainly), MyRouteApp (sometimes)

Links: Zumo 590/5 & BC . . . Zumo XT & BC
jfheath
Posts: 2385
Joined: Sat Oct 19, 2019 4:17 pm
Location: West Yorkshire, Uk
Has liked: 302 times
Been liked: 649 times
Great Britain

Re: How to Create POI Tour Guides - Series of Posts

Post by jfheath »

#7 Placeholder

I am just leaving this here in case I need to add anything else.


I've been wanting to document this process for a long time - never wuite got round to it.

It seems like a lot of work, but actually, when you get into it it is quite rapid. A single GPI file can contain a lot of points of interest. And all you have to do, once it is created is to put it into the POI folder - and those point pop up on the map when you get close. And when you don't want them any more, you simply remove the POI file.

While they are there, you can add those points to a route (if you wish) - just like adding a favourite.
Have owned Zumo 550, 660 == Now have Zumo XT2, XT, 595, 590, Headache
Use Basecamp (mainly), MyRouteApp (sometimes)

Links: Zumo 590/5 & BC . . . Zumo XT & BC
Post Reply